|
|
|
||||||||||||||||||||||||||||||||
 |
|
||||
Go to "Pictures" page. |
Go to "Add to cart" page. |
Video Inspection System Case and Accessories
User Manual
Go to the website www.kmplayer.en.softonic.com/download and download the KMPlayer software for free.
Assembling and Operating Instructions
--------------------------------------------------------------------------------
Read this manual carefully before operating this system
WARNING
4. Warranty invalidated if the device is disassembled by users or if there are any
physical damages.
5. Always back up your data before connecting your USB stick / Micro SD Card
to this system. The manufacturer is not responsible for any data damage or
loss on your USB stick / Micro SD Card for any reason.
6. Do not disconnect the unit while recording or playing. It may damage the unit
and/or the USB stick / Micro SD Card.
battery pack may be damaged or the system cannot work properly.
This USER MANUAL is for Model Numbers: |
CONTENTS
Assembly Drawing and Parts List............................................... ..1
Specifications....................................................................................2
User Manual.....................................................................................3
Application.......................................................................................3
Know your Device.............................................................................4
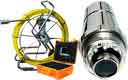
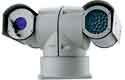
Camera Head....................................................................................5
Cable Reel..........................................................................................5
Remote Control (For Operating DVR only)...................................5
System Set-Up....................................................................................6
System Menu Setting............................................................. ...........7
Recording Operation.........................................................................7
LED Indicators...................................................................................9
Recording Time Limit........................................................................9
Schedule Recording............................................................................9
Recording via USB Stick/ Micro SD Card.......................................10
Video Recording Format...................................................................10
Voice Recording ................................................................................10
Video Playing.....................................................................................10
Select the Video File..........................................................................10
Fast Forwarding and Rewinding.....................................................10
Compatible Video Format................................................................11
Video Player Software Installation..................................................11
Locating the Camera Head with Built- in Transmitter…………..14
Recharging the Battery.....................................................................14
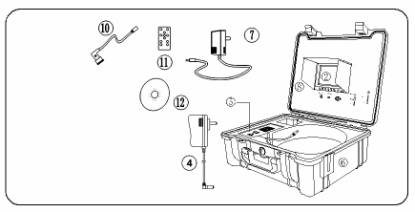
Assembly Drawing and Parts List
Part No. |
Description |
|
|
2 |
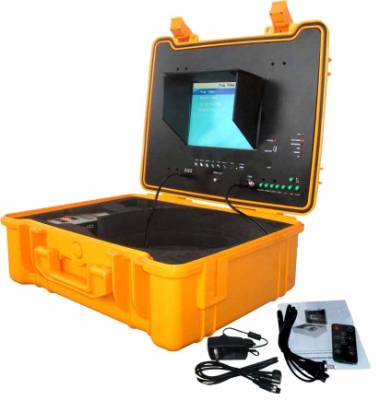
□7” Monitor /3188 Series □10” MONITOR/4188 |
|
|
4 |
Charger |
5 |
Battery case |
6 |
Big Case |
7 |
Dc 12v POWER SUPPLY |
8 |
Sun shIELD |
|
|
10 |
1.5m VIDEO SOFT CABLE (SHORT) |
11 |
Remote control |
12 |
DISC |
Page 1
Specifications
Item |
Description |
Power adapter |
110VAC~240VAC 12VDC1200mA |
Battery Case |
LI-ION battery |
Length of Cable |
20m(65FT)□30m(100FT)□40m(130FT)□ |
|
|
|
|
|
|
|
|
Monitor Image |
7”/ 10” TFT LCD Color Monitor |
Monitor Picture Resolution |
1440*234 pixel |
Monitor Input Voltage |
12 Volts DC |
System Operating Temperature |
-28°C to 50°C |
Page 2
User Manual
ApplicationFROM 1” – 6” (25MM - 150MM) FOR :
Warning: NEVER USE THIS DEVICE IN AN ENVIRONMENT WITH EXPLOSIVE MATERIALS SUCH AS GAS, OIL, ETC.
Page 3
Know Your Device
RECORDING WITH DVR VIA USB PORT: (New versions equipped with items from 17 to 25.)
8. FLAT SCREEN
9. DC 12V IN
10.VIDEO OUT
11.CAMERA PORT
12.Micro SD PORT (Only for NEW VERSIONS )
13. POWER & CHARGE button
14. CHARGE PORT
15. DC 12V OUTPUT CORD
16. Sunshade
17. MIC
18.RECORDing / shooting
19.ENTER
20.MENU / exit
21.LEFT
22.RIGHT
23.mic on/off
Page 4
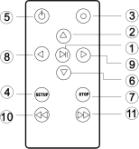
Remote Control to operate DVR / Micro SD Card Recording
 Enter: System in
 6) Down: Select down/next item
7) Exit: Stop or exit from current menu
8) Left: Select Left item
9) Right: Select Right item
10) Rewind: Review video
11) Forward: forward video
Page 5
System Set-Up
Note : Don’t misuse the Power Cord and Battery Charger Cable , otherwise the
system can not work properly, or the battery pack may be damaged.
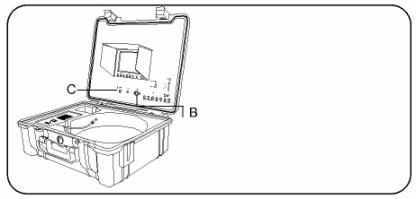
Figure 1
System Menu Setting
Clock setting: set date and time |
|
Time Format |
Select: 24Hour - 12Hour |
Year |
Set year |
Month |
Set month |
Day |
Set day |
Hour |
Set hour |
Minute |
Set minutes |
Second |
Set seconds |
Language Setting |
Select: English - Chinese |
System: showing software version, product version, free space and used space (when USB/Micro SD is connected) |
|
Record setup: Storage Device Selection---USB Stick or Micro SD |
|
Play Mode: No circle, One circle, List circle |
|
Master reset: press OK again to perform a master reset |
|
Firmware update: locate the directory where new firmware is stored |
|
Browse File: |
|
Showing all files on the current USB/ Micro SD medium. |
|
Remove USB/Micro SD device(only when USB/Micro SD device is connected) |
|
Page 7
Remark: When you plug in the USB stick/Micro SD card before starting the device, sometimes the computer can’t find the USB stick/Micro SD card. In this case, please remove them and try again.
![]()

Page 8
|
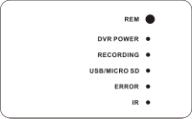 LED indicators
The recorded video files will be found in a directory of USB devices.
You can use the on-screen menu or press (REC) button to start recording. Press (■/EXIT) button to stop recording. During the recording, the screen will display recording time and time limit (up to 3 hours).
You can press [setup] button to change recording time limit from 1 to 180 minutes. The recorded content can be viewed from a computer.
Sometimes you may forget to stop the recording after it is initiated. This unit is featured with a recording time limit. The default time limit is 2 hours. You can go to SETUP mode to increase or decrease the limit from1 to 180 minutes.
You can schedule a recording in advance. Simply enable the schedule recording in the SETUP and then the unit will ask user to setup timing. Recording schedule can be used once. You have to set up schedule again for next recording.
Page 9
The unit can be used to record video and voice via USB stick / Micro SD Card .The recorded video will be stored in the USB stick / Micro SD Card and can be played back on the screen.
The default video recording resolution is 640*480. One-hour recording will take up storage of 500MB. User may select 320*240 to save storage space.
VOICE Recording
A microphone button located on the front panel allows the user to press the button on to record a voice while the video is recording (This function is only available for new versions).
Video playing
You can use on-screen menu to enter “play video” mode. The unit will display the recorded video and other compatible videos stored in USB stick / Micro SD Card.
It will not list the non-compatible videos.
Select the video file.
When you enter “play video” mode, the set will display all of the available video files on the screen.
You can use [▲] or [▼] button to select desired video and press [►/ENT] button to play.
Press and hold [▲] or [▼] button to go to previous or next video.
Use [►/ENT] button to start or pause the playing .Use [■/exit] button to stop or go back to previous menu.
The screen will display “loading, please wait …” for a few seconds before playing videos.
You can use [►] or [◄] button on the remote control to fast forwarding or rewinding (1x, 2x, 4x, or 8x, speed).Always press[►/ENT] button to go back to normal playing.
Page 10
Compatible video format:
Divx3.11 / Divx4 / Divx5 / MPEG1 / MPEG2 / MPEG4 (MPEG4 video file format: .avi, .m4v, .MPG, MPEG, .VOB)
Note: The video player of the device may not support some downloaded videos.
Video Player Software Installation
Generally, the recorded videos can be played on the computer purchased after the year 2006. If you can not open the recorded document on computer, there are two options:
Option 1: Go to the website www.kmplayer.en.softonic.com/download and download the KMPlayer software for free.
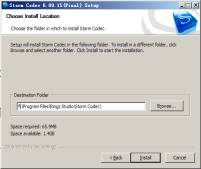
Option 2: Install the video player software on the DISC enclosed by putting it into CD-ROM of your computer according to the icon as follows:
Page 11
Page 12

Page 13
Recharging the Battery
1) Plug the Charger into the AC socket on the wall and insert the other end into the DC Jack on the Battery Box (See Figure2- A)
2) Press the button (See Figure2-B) while the Battery Box is turned off. The battery can be charged while the Battery Box is on and the device is being used. However, once the power in the battery runs completely out, it can only be charged when the Battery Box is turned off.
3) The Charge LED will be red during the process of charging and will turn green when charging is finished (normal charging time: 5 – 6 hours).
Figure 2
IMPORTANT MESSAGE: Do not overcharge the battery! Overcharging can result in acid leaking from or damage to the battery.
Page 14
Battery specifications:
TROUBLE SHOOTING
Trouble |
Solution |
Blank Screen |
1. Change the fuse |
2. Recharge the battery |
|
3. Check power line and connect it again. |
|
No signal |
1. Read the manual again and reconnect it. |
2. Check the camera head. |
|
3. Clean the camera connectors. |
|
|
|
The camera has weak or no light |
Press the “MENU” button, locate the LED brightness setting and then adjust the brightness. |
No recording |
1. Press the “Video” button and change to Video2. |
2. Press POWER button and the monitor indicator light is green. |
|
3. Use another USB disk /micro SD and try again. |
|
Record abnormity |
Shut off the unit and restart the unit in right steps. |
Flashing pictures |
1. Deficiency of the battery power. Please recharge the battery. |
2. Misuse of the charger cable and power cord. |
|
Battery does not Recharge |
1. Misuse of the charger cable and power cord. |
Page 15
 |
 |
 |
 |